Summary
During the configuration of Digital Sign Service (DSS) for Server with Active Directory in O365 (Azure AD), we need to create an application registration with rights to read Active Directory objects in your O365 tenant.
In this article, there are two App Registrations in Azure covered:
Create Azure app for reservation management (this is required for the system to work)
Create Azure app for Keyboard function in DSS Client and Log in function in Workspace (this is optional, it is used for Workspace app and user authentication from the door signs)
Create Azure app for mail sending function
Create Azure app for use of Workspace
Create Azure app for reservation management
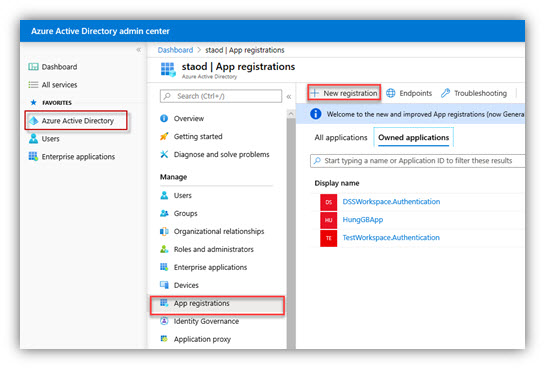
1. Log on Azure portal with your Azure account.
2. If your account gives you access to more than one, click your account in the top right corner, and set your portal session to the desired Azure AD tenant.
3. In the left-hand navigation pane, click the Azure Active Directory service (if it absent, click on All services and find it by name), click App registrations → New registration.

4. When the Register an application page appears, enter your application's registration information:
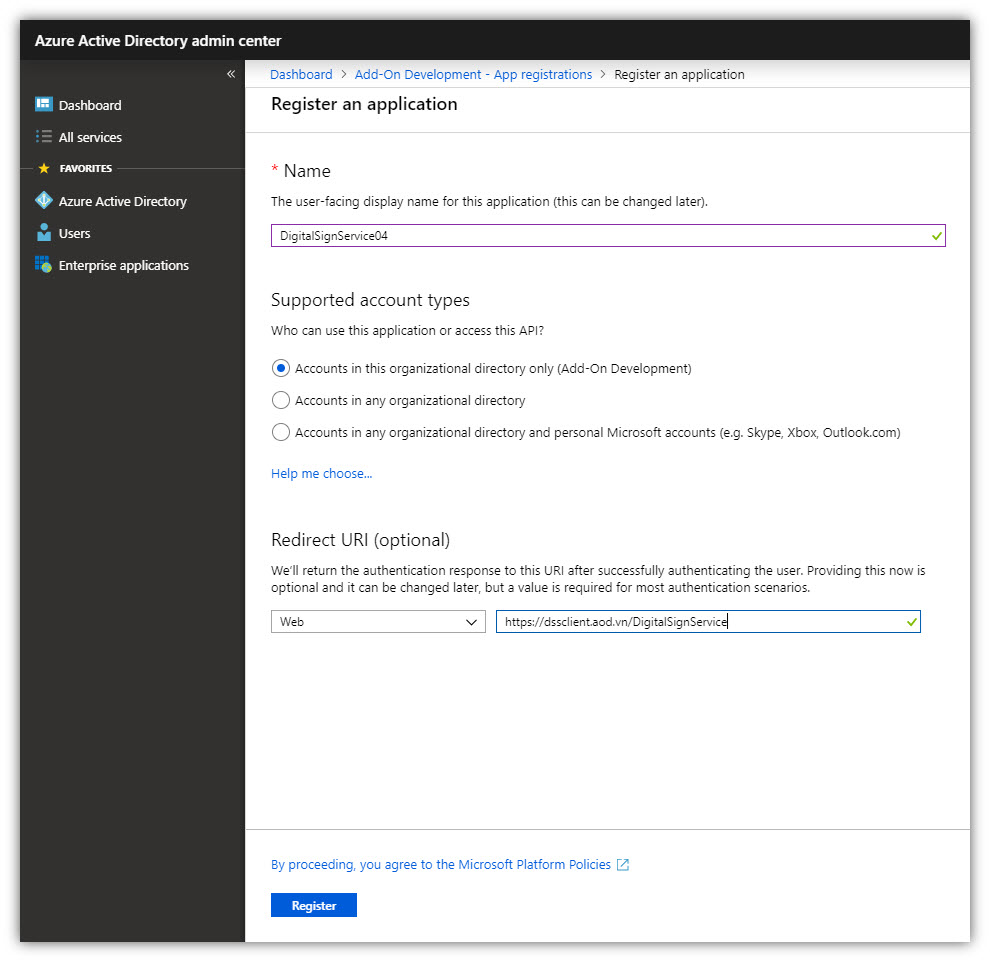
- Name: Enter DigitalSignService.MachineName (or any name you want).
Note: Name of the web app must not include spaces or digits.
- Supported account types: Select ‘Accounts in this organizational directory only’.
- Redirect URI: Enter your web app URL (the address of a web page where users can sign in and use your app). The APP ID URI is your Azure Tenant URI followed by your app name (unique identifier for Azure AD to identify your app).
5. When finished, click Register.
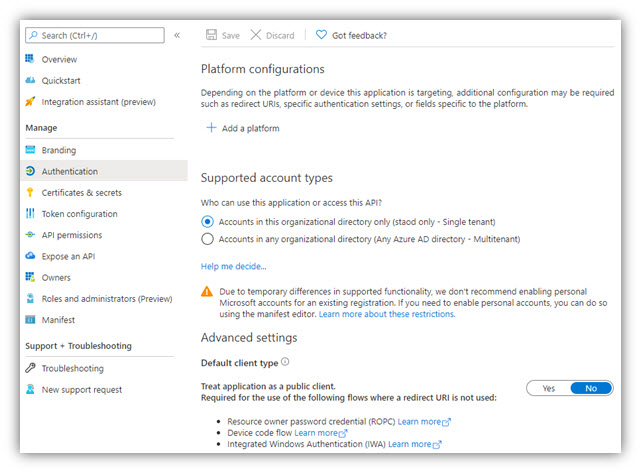
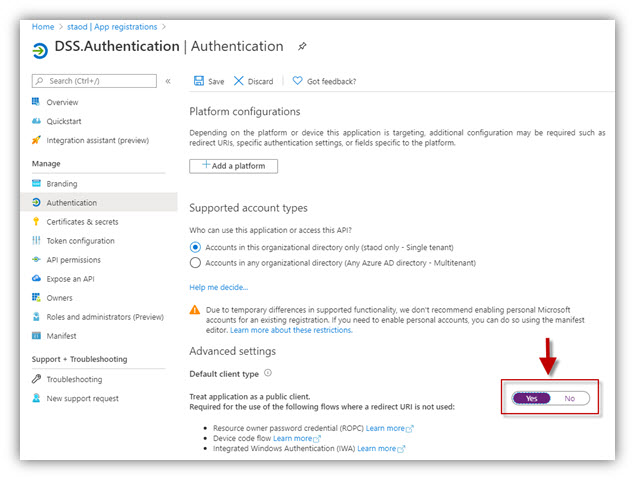
6. Go to Authentication, select No for ‘Treat application as a public client’
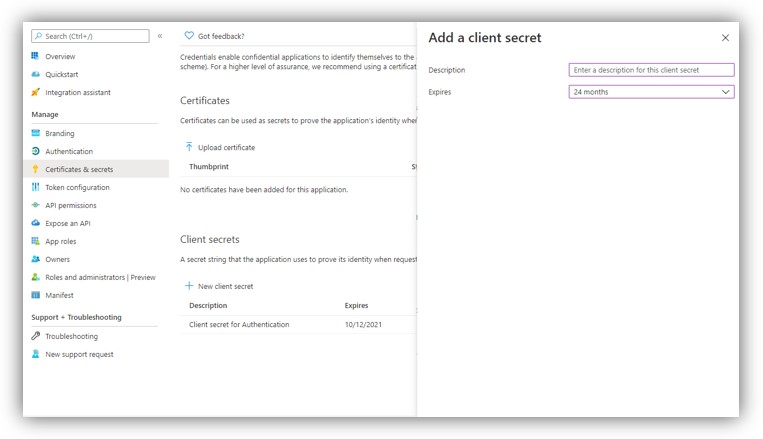
7. Go to Certificates & secrets → New client secret (key):
Note: Select ‘24 months’ for Expires.
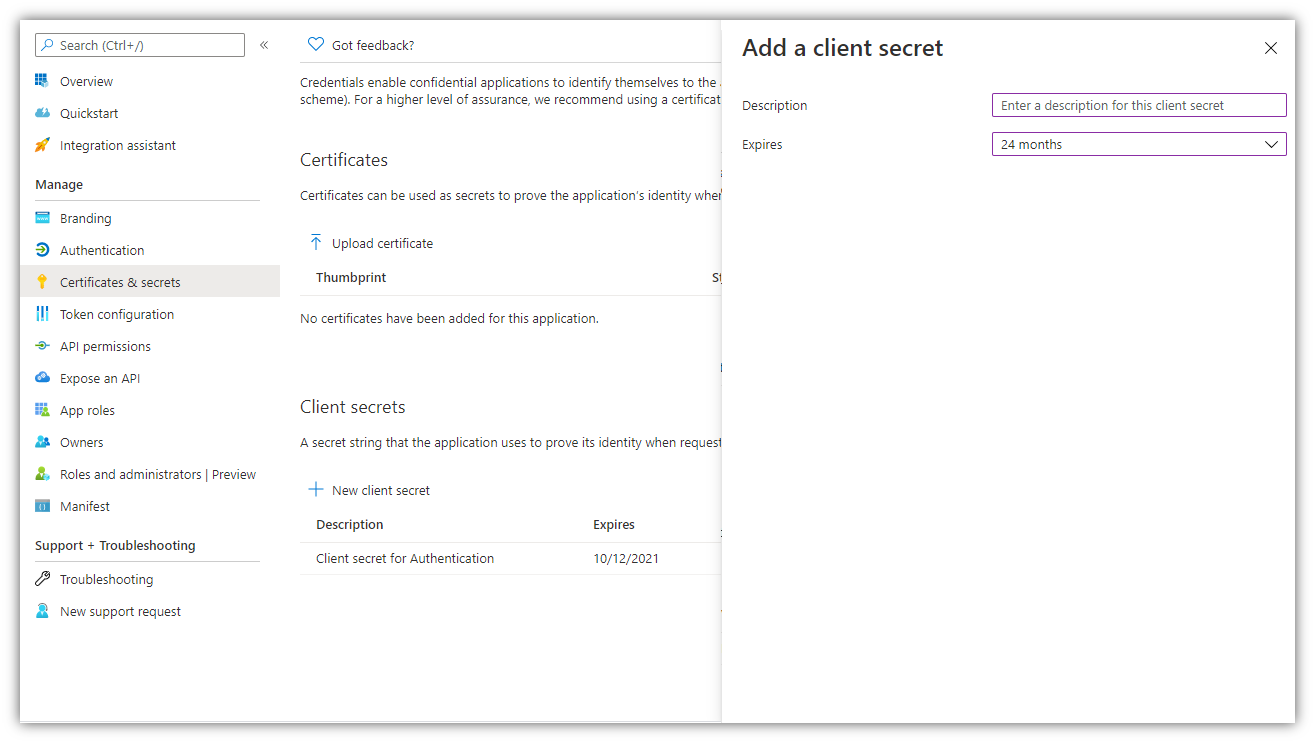
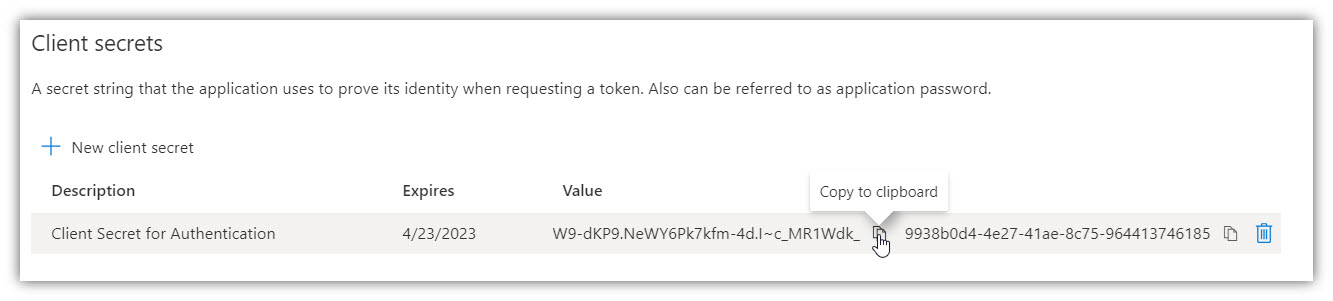
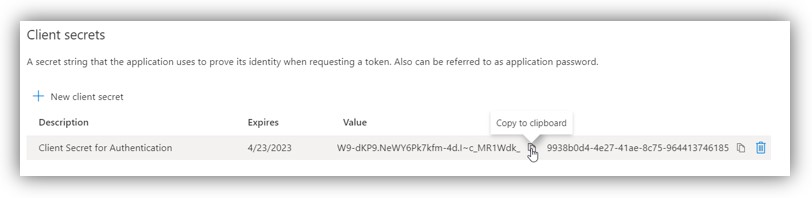
8. Add a description for your key and click [Add]. The right-most column will contain the key value (Password), after you save the configuration changes. Be sure to copy the Value for use in Digital Sign Service (inside it’s Password field), as it is not accessible once you leave this page.
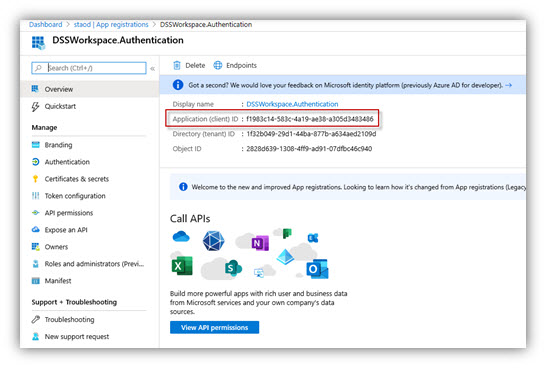
9. Click [Overview] to go back. The Application (Client) ID field will contain App principal ID for Digital Sign Service.
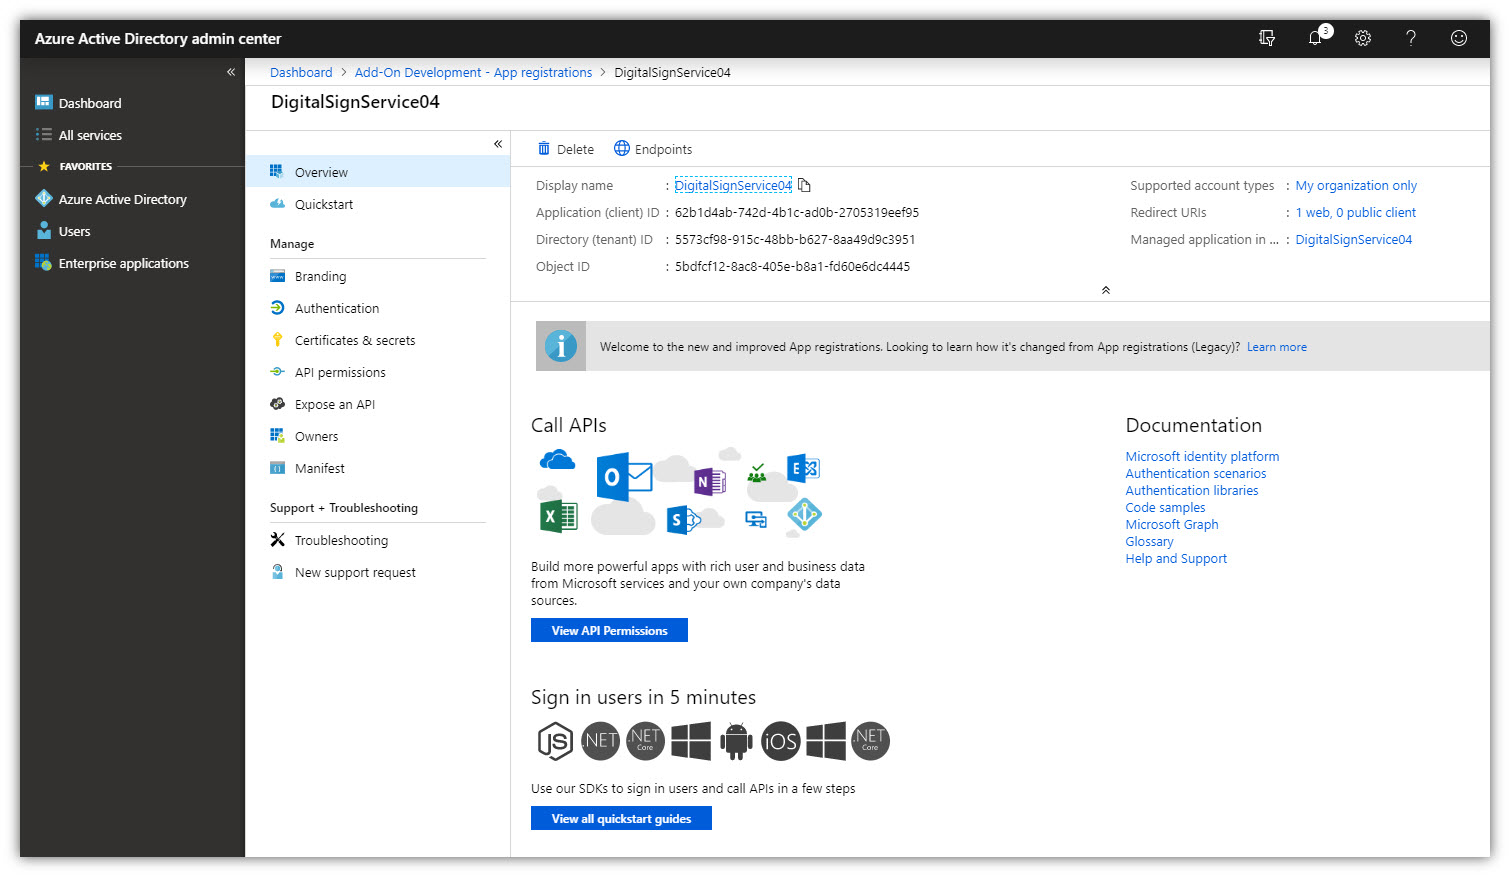
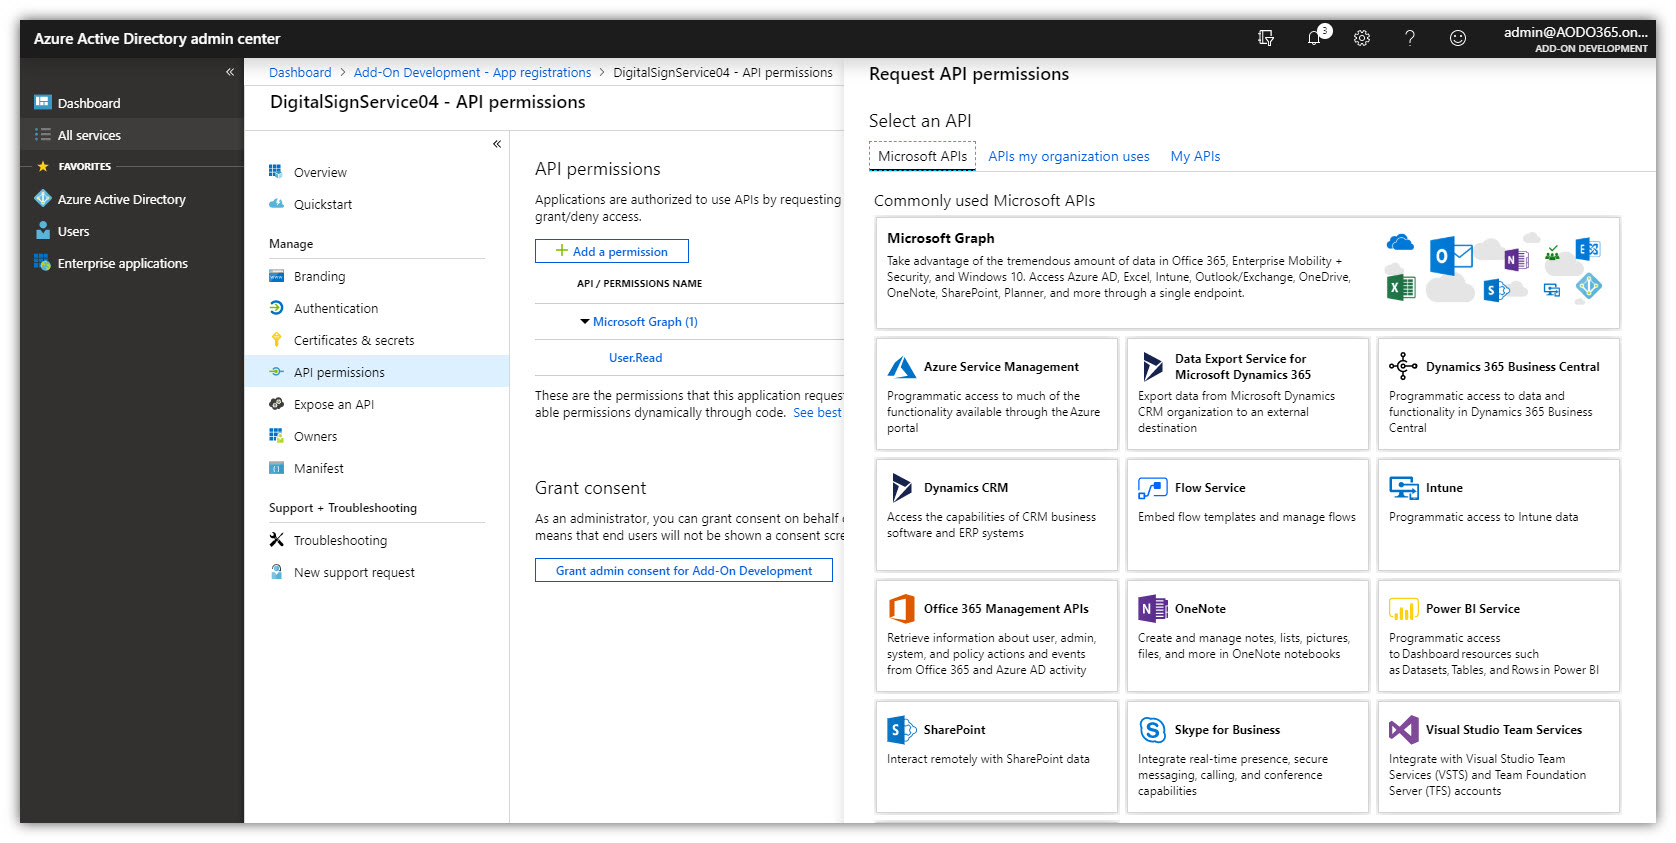
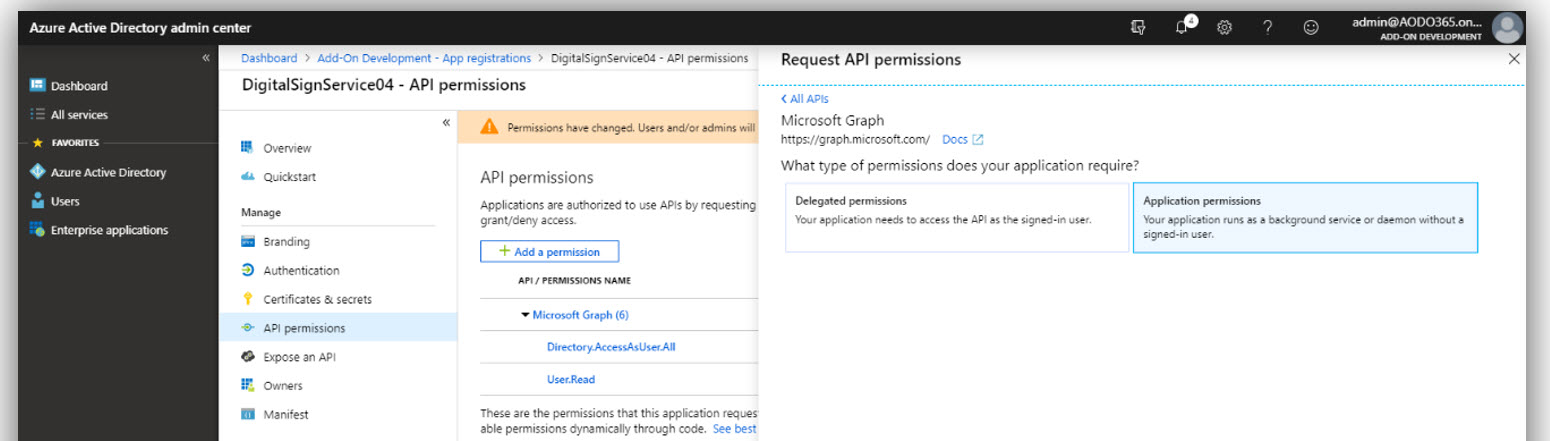
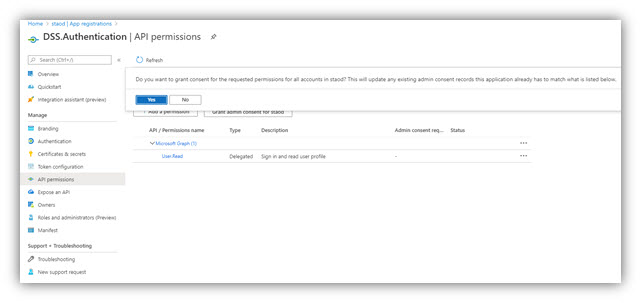
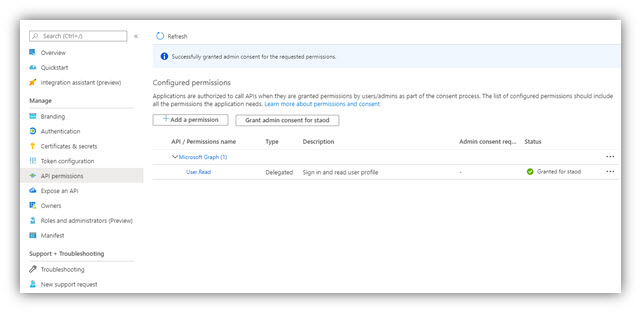
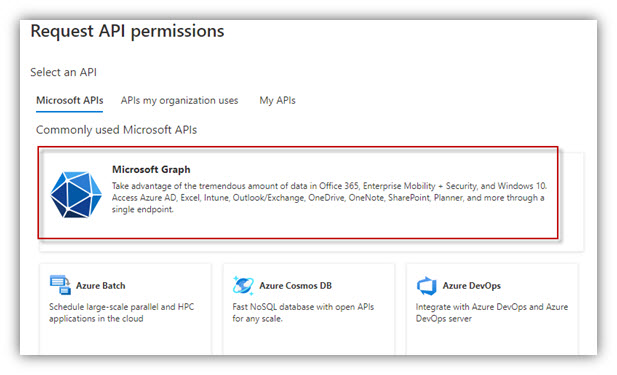
- Click the API Permissions section on the menu → Add a permission. Select tab Microsoft APIs → Click [Microsoft Graph].
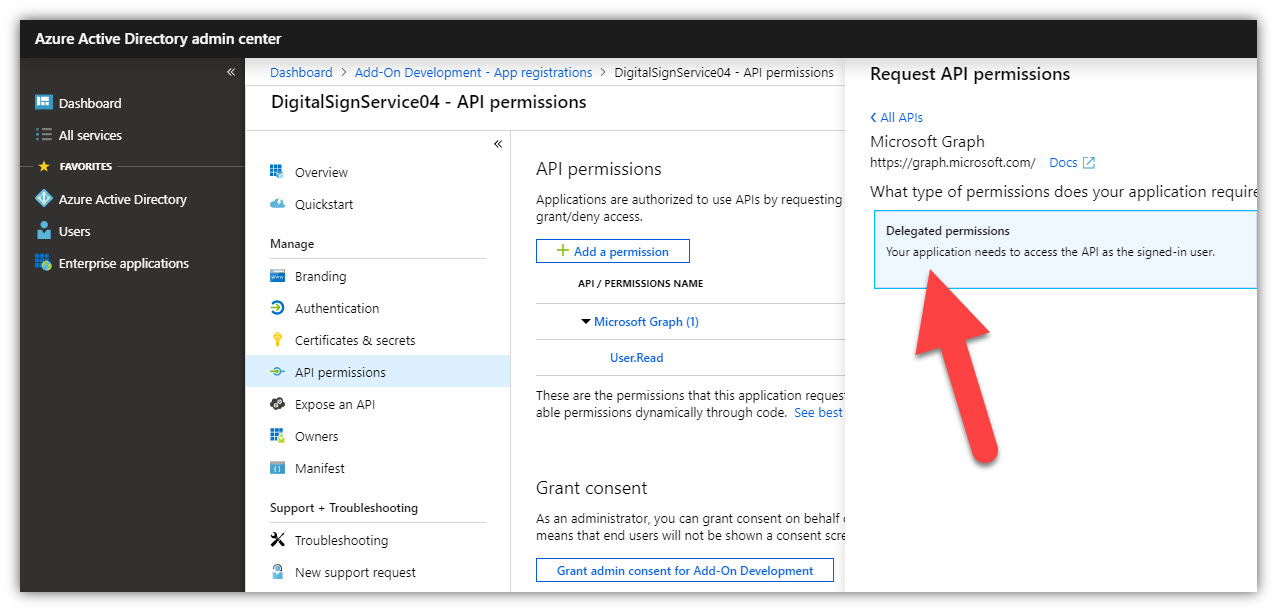
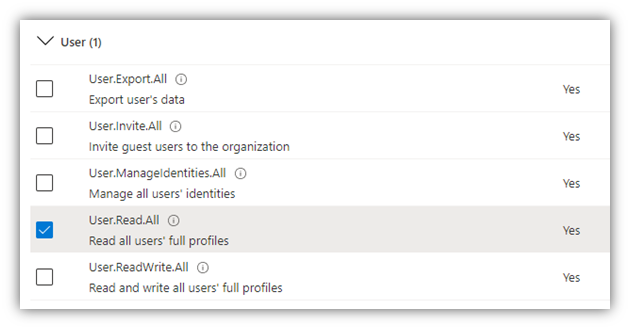
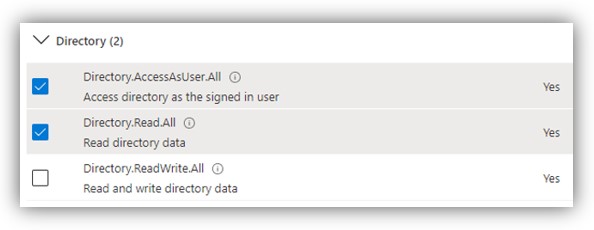
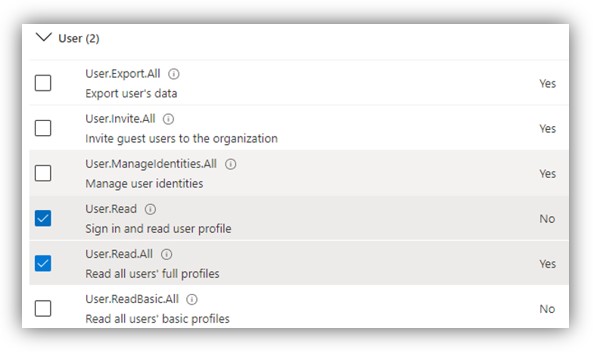
- In the opened panel, click [Delegated permissions], scroll down to Directory and check on permissions as shown in the following figures:
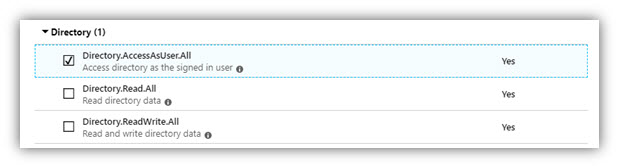
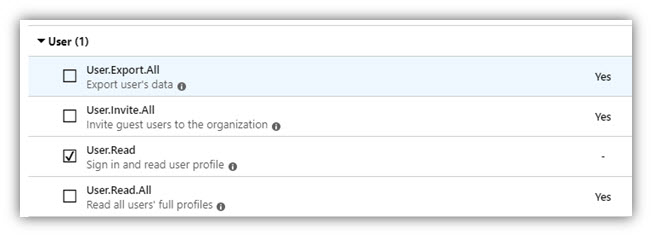
NOTE: The User.Read permission is needed for use of NFC card reader in DSS Client and for retrieving token thanks to which the system can work normally.
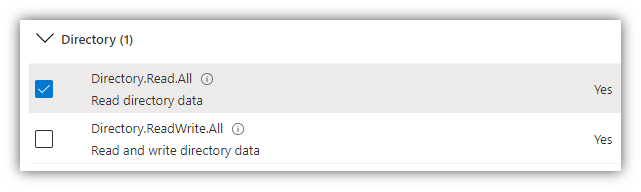
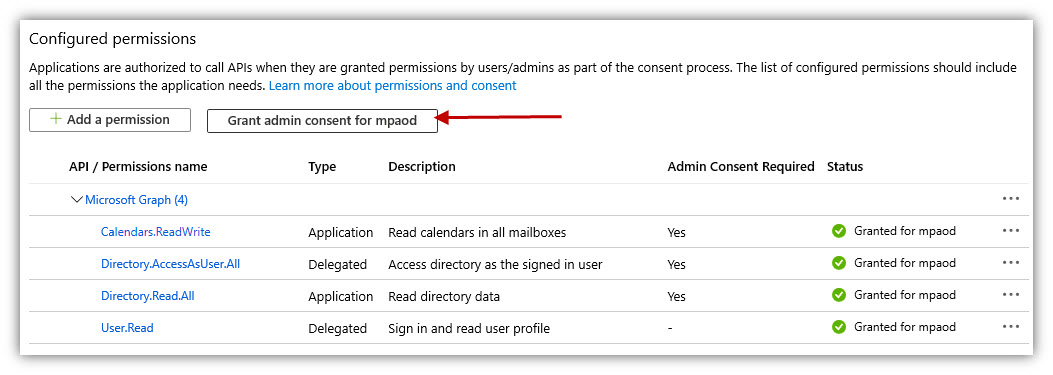
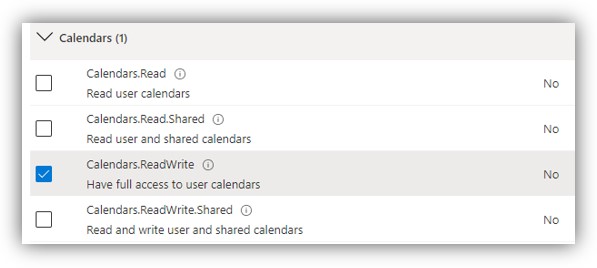
- After that, click [Application permissions], scroll down to Calendars, Directory and Users and check on permissions as shown in the following figures:
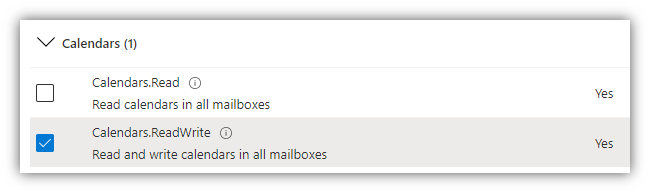
NOTE: If you only want to set permissions for viewing appointments on client side (i.e. user cannot create, extend, and end meetings), the Calendars.ReadWrite permission should be replaced by Calendars.Read permission.
- Click [Add permissions] at the bottom of the panel.
- Then click [Grant admin consent for ...] to finish.
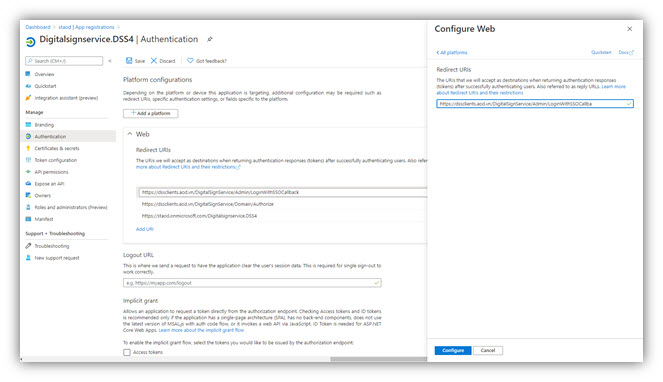
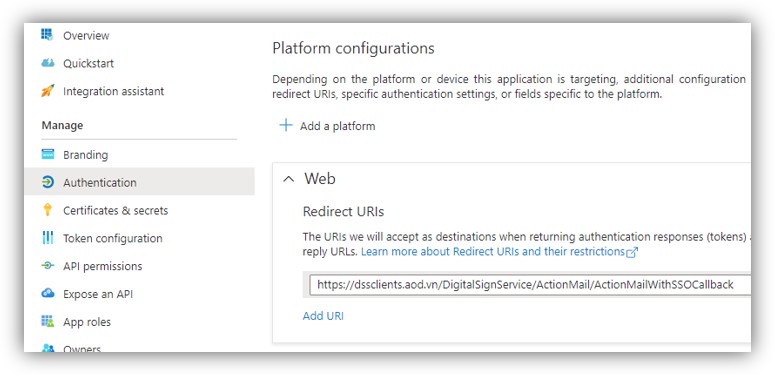
10. Set Redirect URL(s) in [Authentication] tab
In [Authentication] tab, click [Add a platform] then select Web applications/Web on the right panel. Click [Add URI] and enter the Redirect URI of the application.
NOTE: It is required to use HTTPS protocol when using O365/Azure. In case HTTP protocol is used, you need to use PowerShell to set Redirect URL(s) for the app in [Authentication] tab.
The following two redirect URLs must be added by clicking [Add URI]:
- https://[YourDomainName]/DigitalSignService/Domain/Authorize
- https://[YourDomainName]/DigitalSignService/Admin/LoginWithSSOCallback
Once the app described above has been created, you must collect this information for configuration in Digital Sign Service.
- Application (Client) ID must be entered in “App principal ID” field.
- Secret Key must be entered in “Password” field.
- Tenant Name must be entered in “Tenant name” field. (xx.onmicrosoft.com)
Create Azure app for Keyboard function in DSS Client and Log in function in Workspace
1. Log on Azure portal with your Azure account.
2. If your account gives you access to more than one, click your account in the top right corner, and set your portal session to the desired Azure AD tenant.
3. In the left-hand navigation pane, click the Azure Active Directory service (if it absent, click on All services and find it by name), click App registrations --> New registration.
4. When the Register an application page appears, enter your application's registration information:

- Name: Enter WorkSpace.Authentication (or any name you want).
- Note: Name of the web app must not include spaces or digits.
- Supported account types: Select ‘Accounts in this organizational directory only’.
- Redirect URI: Enter your web app URL (the address of a web page where users can sign in and use your app). The APP ID URI is your Azure Tenant URI followed by your app name (unique identifier for Azure AD to identify your app).
5. When finished, click Register. You are presented with the details of the app that you created. Copy the Application (client) ID for later use:
6. Go to Authentication, select Yes for ‘Treat application as a public client’ and click [Save] button:
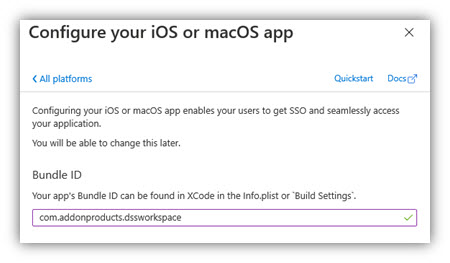
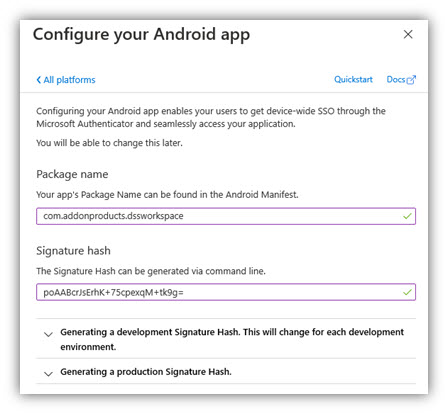
7. Click [Add a platform], select iOS or Android (based on your platform) in ‘Mobile and desktop applications’ section, fill in Package Name/Bundle ID and Signature Hash as in the following figure:
Package name/Bundle ID: com.addonproducts.dssworkspace
Signature hash: poAABcrJsErhK+75cpexqM+tk9g=
For iOS
For Android
8. Go to API Permissions, grant admin consent to the app
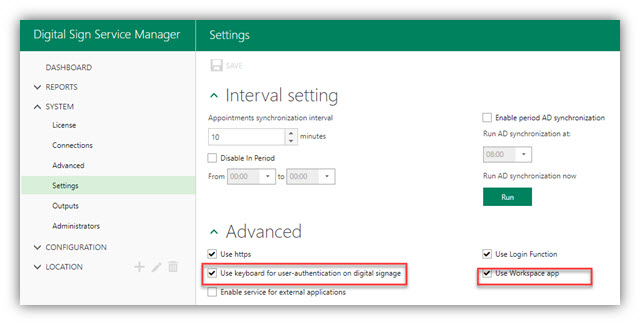
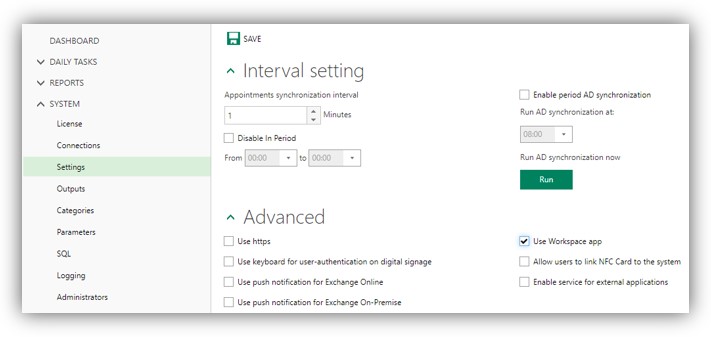
9. Go to Digital Sign Service Manager/SYSTEM/Settings. Check on options as shown in the figure below:
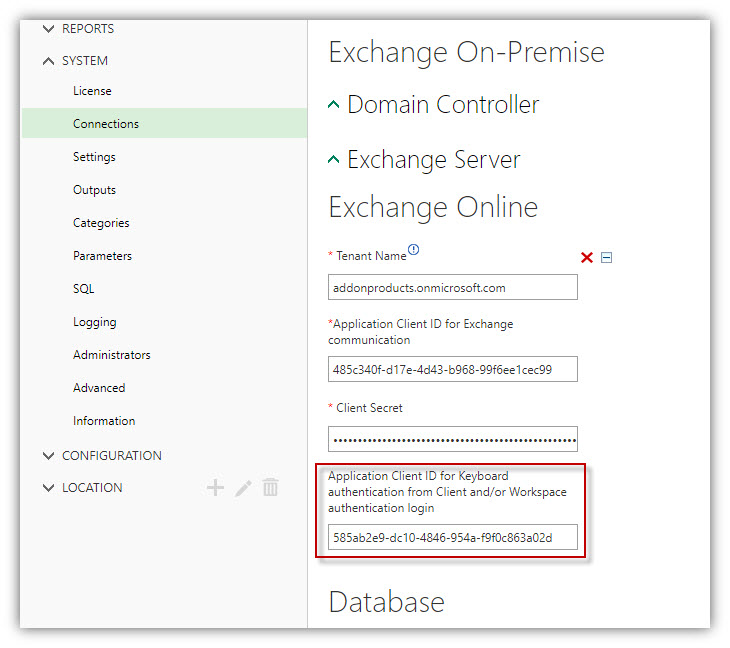
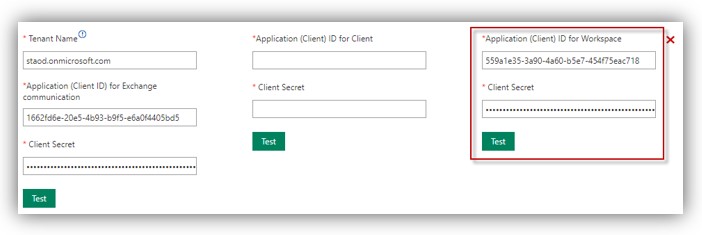
10. Go to Digital Sign Service Manager/SYSTEM/Connections. Copy the Application (client) ID retrieved at Step 5 to the field Application Client ID for Keyboard authentication from Client and/or Workspace authentication login:
Create Azure app for mail sending function
1. Log on Azure portal with your Azure account.
2. If your account gives you access to more than one, click your account in the top right corner, and set your portal session to the desired Azure AD tenant.
3. In the left-hand navigation pane, click the Azure Active Directory service (if it absent, click on All services and find it by name), click App registrations → New registration.
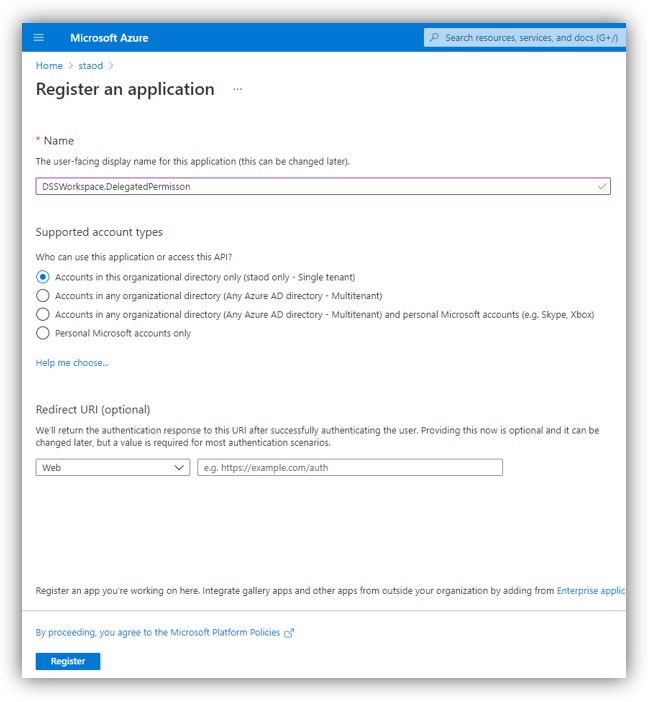
4. When the Register an application page appears, enter your application's registration information:
- Name: Enter DigitalSignService.MachineName (or any name you want).
Note: Name of the web app must not include spaces or digits.
- Supported account types: Select ‘Accounts in this organizational directory only’.
- Redirect URI: Enter your web app URL (the address of a web page where users can sign in and use your app). The APP ID URI is your Azure Tenant URI followed by your app name (unique identifier for Azure AD to identify your app).
5. When finished, click Register.
6. Go to Authentication, select No for ‘Treat application as a public client’
7. Go to Certificates & secrets → New client secret (key):
Note: Select ‘24 months’ for Expires

8. Add a description for your key and click [Add]. The right-most column will contain the key value (Password), after you save the configuration changes. Be sure to copy the Value for use in Digital Sign Service (inside it’s Password field), as it is not accessible once you leave this page.

9. Click [Overview] to go back. The Application (Client) ID field will contain App principal ID for Digital Sign Service.
- Click the API Permissions section on the menu → Add a permission. Select tab Microsoft APIs → Click [Microsoft Graph].

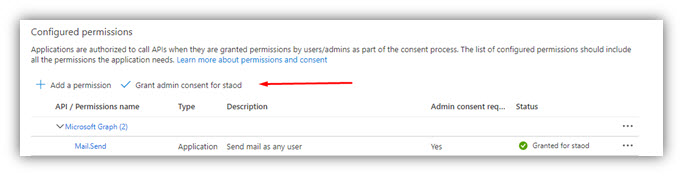
- In the opened panel, click [Application permissions], scroll down to Directory and check on permissions as shown in the following figures:
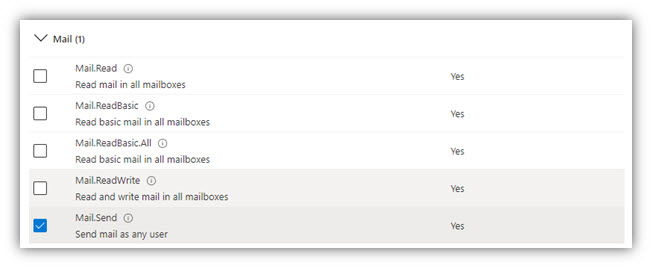
- Click [Add permissions] at the bottom of the panel.
- Then click [Grant admin consent for …] to finish.
You must collect this information for configuration in Digital Sign Service.
- Application (Client) ID must be entered in “App principal ID” field.
- Secret Key must be entered in “Client Secrets” field.
Create Azure app for use of Workspace
1. Log on Azure portal with your Azure account.
2. If your account gives you access to more than one, click your account in the top right corner, and set your portal session to the desired Azure AD tenant.
3. In the left-hand navigation pane, click the Azure Active Directory service (if it absent, click on All services and find it by name), click App registrations → New registration.
4. When the Register an application page appears, enter your application's registration information:
Note: Name of the web app must not include spaces or digits.
- Supported account types: Select ‘Accounts in this organizational directory only’.
5. When finished, click Register. You are presented with the details of the app that you created. Copy the Application (client) ID for later use:

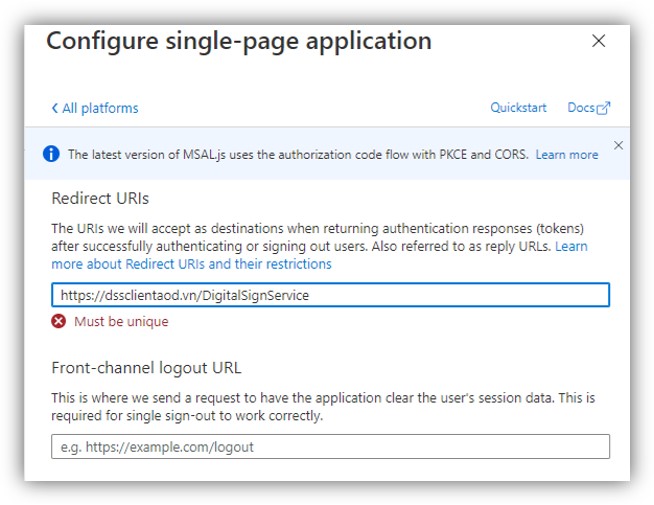
a. In Web platform, add an URI with the following format:
https://[YourDomainName]/DigitalSignService/Admin/LoginWithSSOCallback
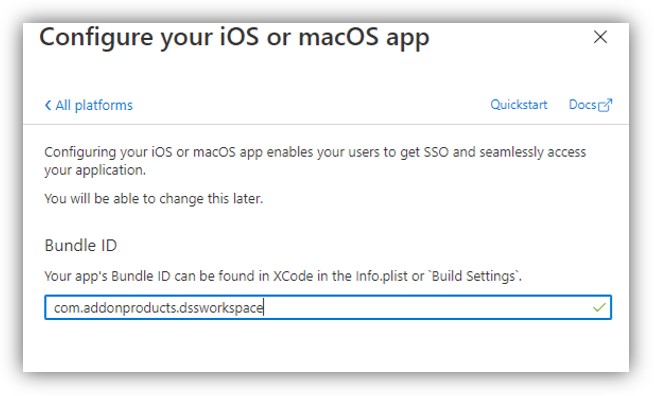
c. Select iOS/macOS on the right panel of the screen (Configure Platforms).
Enter Bundle ID value of workspace app: “com.addonproducts.dssworkspace” and click [Configure].
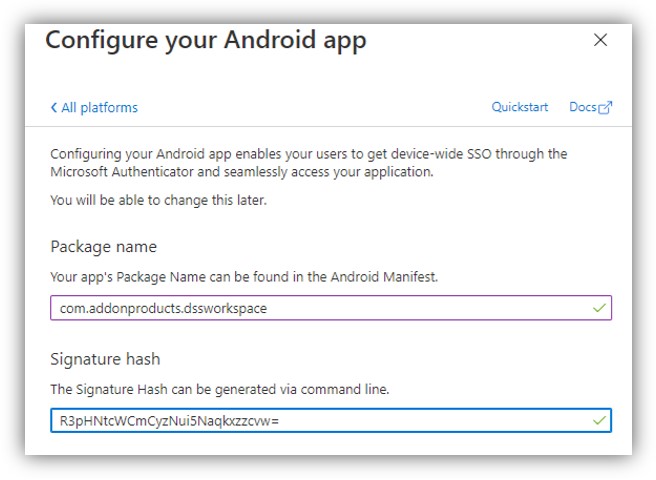
d. Select Android on the right panel of the screen (Configure Platforms). Enter package name and Signature hash:
- Package name: “com.addonproducts.dssworkspace” and
- Signature hash: “poAABcrJsErhK+75cpexqM+tk9g=”
Click [Configure] → [Done].
7. In Authentication, select Yes for Allow public client flows, then click [Save]:

NOTE: Select ’24 months’ for Expires.
In the opened panel, click [Delegated permissions], scroll down to Directory and check on permissions as shown in the following figures:
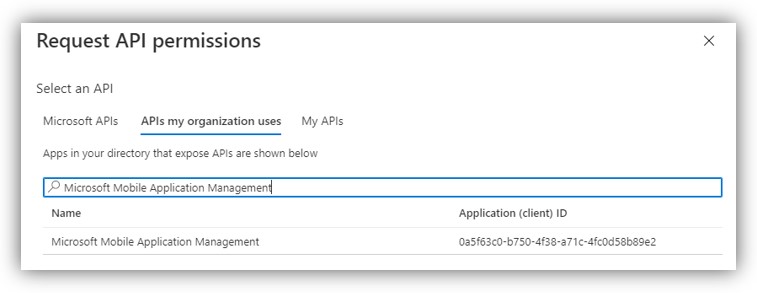
10. Also, in API Permissions section → Add a permission. Select tab APIs my organization uses, then search “Microsoft Mobile Application Management”:
NOTE: This permission can only be used with Microsoft Intune. Read more at: https://docs.microsoft.com/en-us/mem/intune/developer/app-sdk-get-started
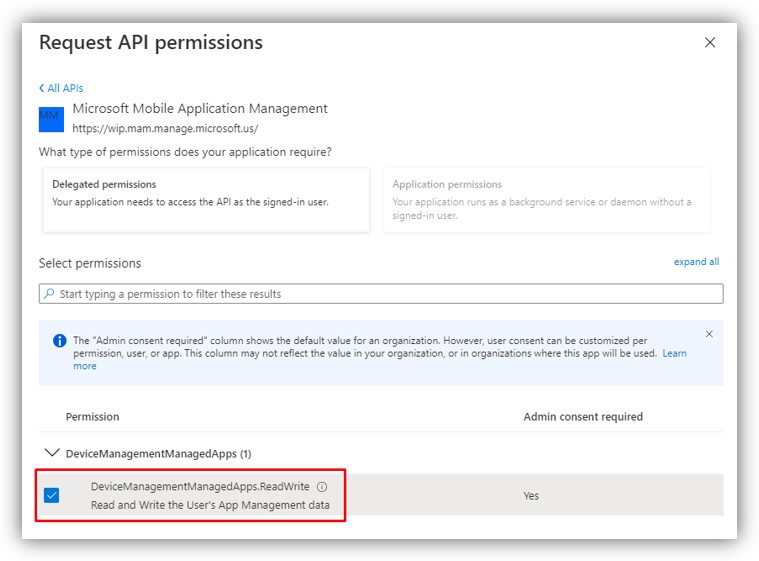
A summary of the assigned permissions can be seen here:
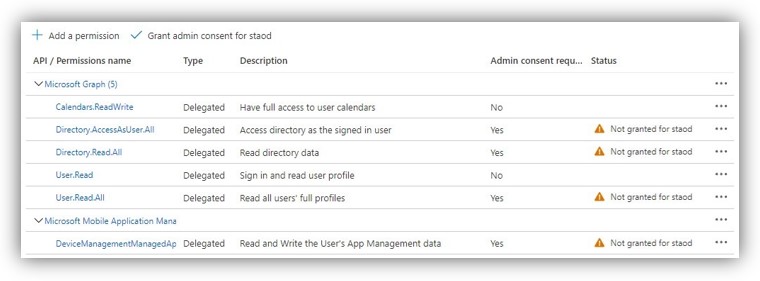
Click [Grant admin consent ...] → [Yes] to finish.
11. Go to Digital Sign Service Manager/SYSTEM/Settings. Check on options as shown in the figure below:
13. Click [Save] to finish.
Properties
Applies to: DSS for Server 4.0, 4.1and 4.2
Reference: TFS #204048,264043
Knowledge base ID: 0262
Last updated: December 27, 2021
Tuan Dinh Cong
Comments